14 Essential Steps for Oracle 12c Load Testing using SLOB on All-Flash Block Storage


Audio : Listen to This Blog.
Testing – whether QA Automation services, testing accelerators or test automation tools, require hands on expertise and deep knowledge. The purpose of this blog is to document on how SLOB can be used for load testing on Oracle 12c database. The guide is specific to Oracle 12c using SLOB on CentOS 7.4.
Configuration used:
Below is the setup we used for experimenting Oracle12c using SLOB.
VM (ESXi) with CentOS release 7.4.x installed (Stand-alone setup)
Below are the versions of software used:
- OS version : Centos 7.4.1708
- Oracle 12c: Oracle Database 12c Enterprise Edition Release 12.2.0.1.0 – 64bit
- SLOB version: Slob_2.4.2.1
Prerequisites:
Below are some the prerequisites before we proceed for Oracle 12c and SLOB installation.
- Yum package management application must be installed.
- Root or sudo access to the install machines.
- At-least 2GB of RAM.
Oracle 12c Installation:
Oracle database is one of the most widely used relational database management systems (RDBMS) in enterprise environments. Developed, maintained, and supported by Oracle Corporation.
This section covers 14 key steps on how can you setup and install Oracle 12c Release 2 on CentOS 7 VM.
Setting up Oracle 12c on ESXi VM running CentOS 7
Step 1 – Install required Packages
Installation of several packages required by Oracle database, like GCC, Binutils, Glibc etc. Hence we will install them from the Centos repository using yum command. Install packages required by Oracle database with yum
yum update -y
yum install -y binutils.x86_64 compat-libcap1.x86_64 gcc.x86_64 gcc-c++.x86_64 glibc.i686 glibc.x86_64 glibc-devel.i686 glibc-devel.x86_64 ksh compat-libstdc++-33 libaio.i686 libaio.x86_64 libaio-devel.i686 libaio-devel.x86_64 libgcc.i686 libgcc.x86_64 libstdc++.i686 libstdc++.x86_64 libstdc++-devel.i686 libstdc++-devel.x86_64 libXi.i686 libXi.x86_64 libXtst.i686 libXtst.x86_64 make.x86_64 sysstat.x86_64 zip unzip smartmontools
[root@oracledb ~]# cat /etc/hosts
10.20.178.69 oracledb
Step 2 – Configure User and System
Create new groups named ‘oinstall‘ and ‘dba‘, then create a new user ‘oracle‘ and add it to the ‘oinstall’ group.
groupadd oinstall
groupadd dba
useradd -g oinstall -G dba oracle
passwd oracle
TYPE THE PASSWORD
Edit ‘sysctl.conf‘ file with vim & update the below details,
vim /etc/sysctl.conf
fs.aio-max-nr = 1048576
fs.file-max = 6815744
kernel.shmall = 2097152
kernel.shmmax = 2147483648
kernel.shmmni = 4096
kernel.sem = 250 32000 100 128
net.ipv4.ip_local_port_range = 9000 65500
net.core.rmem_default = 262144
net.core.rmem_max = 4194304
net.core.wmem_default = 262144
net.core.wmem_max = 1048586
Save the file and exit the editor.
Now run the commands below to display all kernel parameter and apply the new values.
sysctl -p
sysctl -a
Edit ‘limits.conf‘ file with vim. Update the below & save the file and exit the editor.
vim /etc/security/limits.conf
oracle soft nproc 2047
oracle hard nproc 16384
oracle soft nofile 1024
oracle hard nofile 65536
oracle soft stack 10240
Step 3 – Configure Desktop
Install X Window System with yum command below.
yum groupinstall -y "X Window System"
When the installation is done, open a new terminal and connect to the server as oracle user with the ssh command option below
ssh -X [email protected]
Step 4 – Download Oracle Database
If you do not have an Oracle account yet, register one and then login to download Oracle 12c for Linux.
Below are my oracle files,
[root@oracledb ~]# mkdir ~/oracle
[root@oracledb ~]# cd ~/oracle/
[root@oracledb oracle]# ll
total 3372752
-rw-r--r--. 1 root root 3453696911 May 13 14:25 linuxx64_12201_database.zip
Extract the Oracle files to a new directory named ‘stage‘.
[root@oracledb oracle]# unzip linuxx64_12201_database.zip -d /stage/
Change owner and group of the ‘/stage/’ directory to the oracle user and oinstall group.
[root@oracledb oracle]# chown -R oracle:oinstall /stage/
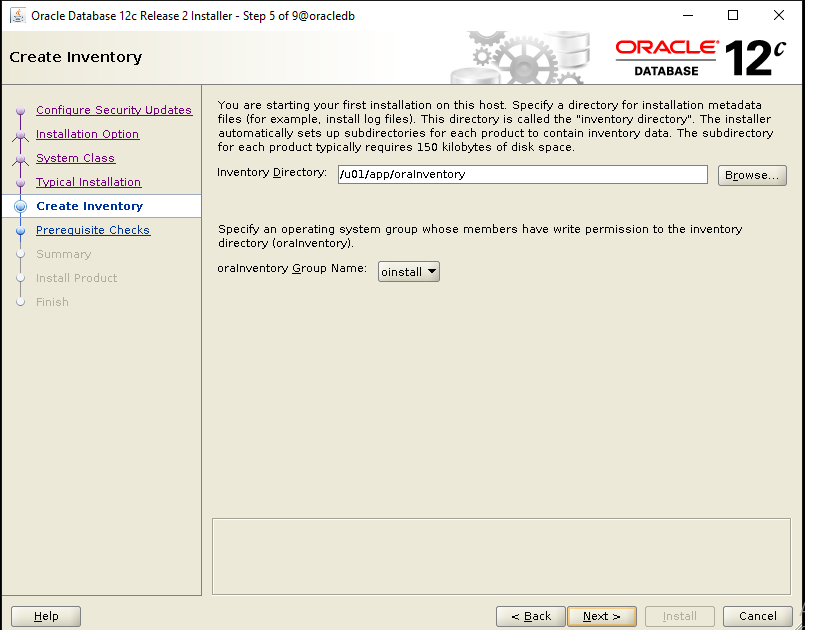
Step 5 – create new directories for the Oracle installation files and Oracle database files
Storage Configuration:
Created 2 vdisks of 100GB, 1TB on CentOS 7 VM - ESXi Datastore created using Storage volume.
fdisk /dev/sdb - 100G
fdisk /dev/sdc - 1TB
mkfs -t xfs /dev/sdb1
mkfs -t xfs /dev/sdc1
mkdir -p /u01 /u02
mount /dev/sdb1 /u01
mount /dev/sdc1 /u02
[root@oracledb ~]# cat /etc/fstab
/dev/sdb1  /u01  xfs   defaults   0 0
/dev/sdc1  /u02  xfs   defaults   0 0
Directory ‘/u01‘ is for the Oracle installation files and ‘/u02‘ for the Oracle database files.
Change owner and group of the new directories and set permissions to ‘755’.
[root@oracledb ~]# chown -R oracle:oinstall /u01 /u02
[root@oracledb ~]# chmod -R 775 /u01 /u02
[root@oracledb ~]# chmod g+s /u01 /u02
Oracle is downloaded and the new directories for the installation are ready.
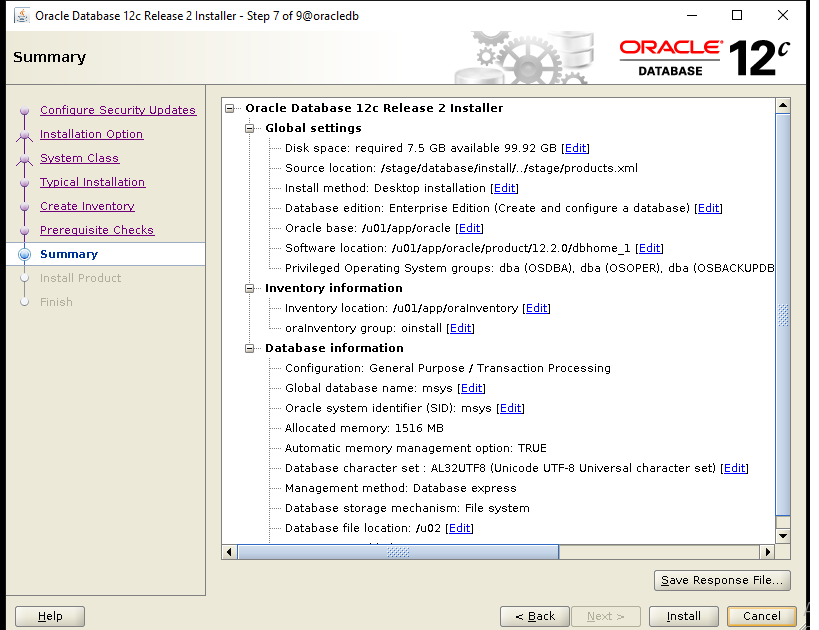
Step 6 – Install Oracle Database 12c
Open a new terminal and connect to the CentOS 7 server using the oracle user with the ssh command below.
ssh -X [email protected]
Go to the stage database directory and run the installer file.
[oracle@oracledb ~]$ cd /stage/database/
[oracle@oracledb database]$ ./runInstaller
Starting Oracle Universal Installer...
Checking Temp space: must be greater than 500 MB.   Actual 37229 MB    Passed
Checking swap space: must be greater than 150 MB.   Actual 3967 MB    Passed
Checking monitor: must be configured to display at least 256 colors.    Actual 16777216    Passed
Preparing to launch Oracle Universal Installer from /tmp/OraInstall2019-05-16_02-59-35PM. Please wait ...[oracle@oracledb database]$
And you will see the GUI installation screen below, there click ‘Next‘.
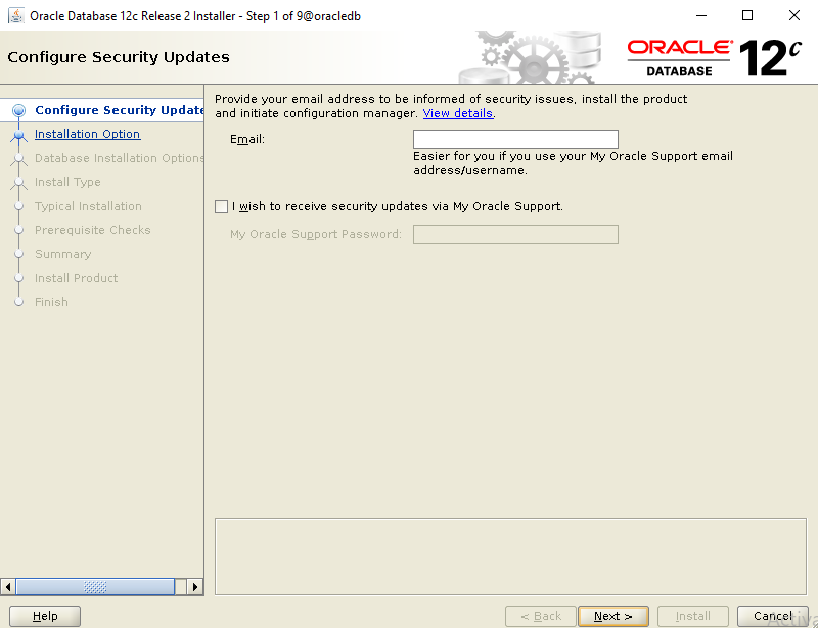
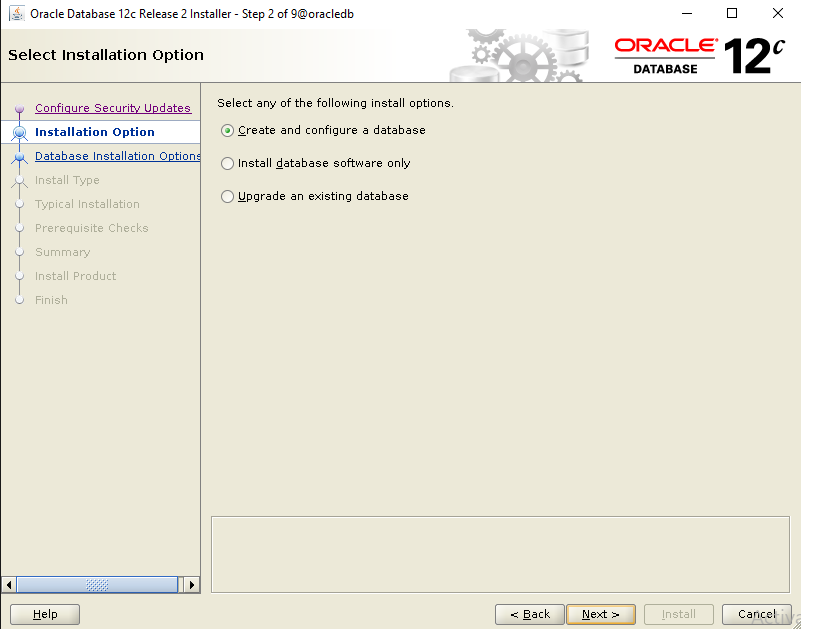
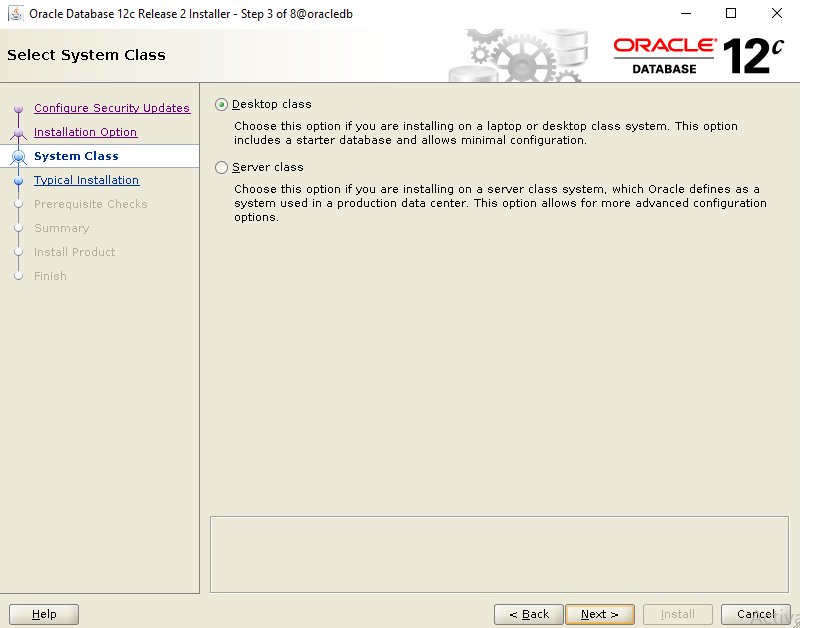
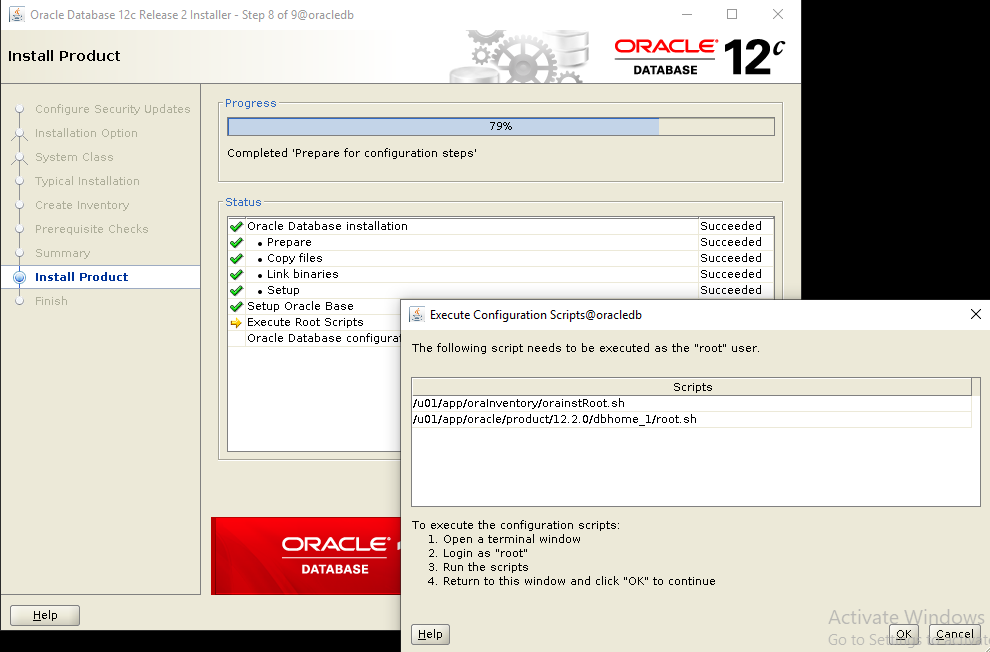
During installation process, you will be asked to execute some scripts as root.
[root@oracledb ~]# cd /u01/app/oraInventory/
[root@oracledb oraInventory]# ./orainstRoot.sh
Changing permissions of /u01/app/oraInventory.
Adding read,write permissions for group.
Removing read,write,execute permissions for world.
Changing groupname of /u01/app/oraInventory to oinstall.
The execution of the script is complete.
[root@oracledb ~]# cd /u01/app/oracle/product/12.2.0/dbhome_1/
[root@oracledb dbhome_1]# ./root.sh
Performing root user operation.
The following environment variables are set as:
ORACLE_OWNER= oracle
ORACLE_HOME=  /u01/app/oracle/product/12.2.0/dbhome_1
Enter the full pathname of the local bin directory: [/usr/local/bin]:
Copying dbhome to /usr/local/bin ...
Copying oraenv to /usr/local/bin ...
Copying coraenv to /usr/local/bin ...
Creating /etc/oratab file...
Entries will be added to the /etc/oratab file as needed by
Database Configuration Assistant when a database is created
Finished running generic part of root script.
Now product-specific root actions will be performed.
Do you want to setup Oracle Trace File Analyzer (TFA) now ? yes|[no] :
no
Oracle Trace File Analyzer (TFA - User Mode) is available at :
/u01/app/oracle/product/12.2.0/dbhome_1/suptools/tfa/release/tfa_home/bin/tfactl
OR
Oracle Trace File Analyzer (TFA - Daemon Mode) can be installed by running this script :
/u01/app/oracle/product/12.2.0/dbhome_1/suptools/tfa/release/tfa_home/install/roottfa.sh

Click ‘Close‘.
Step 7 – Testing
The Oracle installation is finished and ready for testing. I will try to access Oracle from the command line first (sqlplus)
Log in to the server and access the oracle user.
[root@oracledb ~]# su - oracle
Add the following lines to .bash_profile file
[oracle@oracledb ~]$ cat .bash_profile
# .bash_profile
# Get the aliases and functions
if [ -f ~/.bashrc ]; then
. ~/.bashrc
fi
# User specific environment and startup programs
export ORACLE_SID=msys
export ORACLE_HOME=/u01/app/oracle/product/12.2.0/dbhome_1
export PATH=$ORACLE_HOME/bin:$PATH
Reloading .bash_profile to apply the new settings
[oracle@oracledb ~]$ source .bash_profile
Note: Exit out of the terminal & re-login as oracle user.
Testing to make sure Sqlplus is working fine.
[oracle@oracledb ~]$ sqlplus / as sysdba
SQL*Plus: Release 12.2.0.1.0 Production on Thu May 16 16:33:48 2019
Copyright (c) 1982, 2016, Oracle.  All rights reserved.
Connected to:
Oracle Database 12c Enterprise Edition Release 12.2.0.1.0 - 64bit Production
SQL>
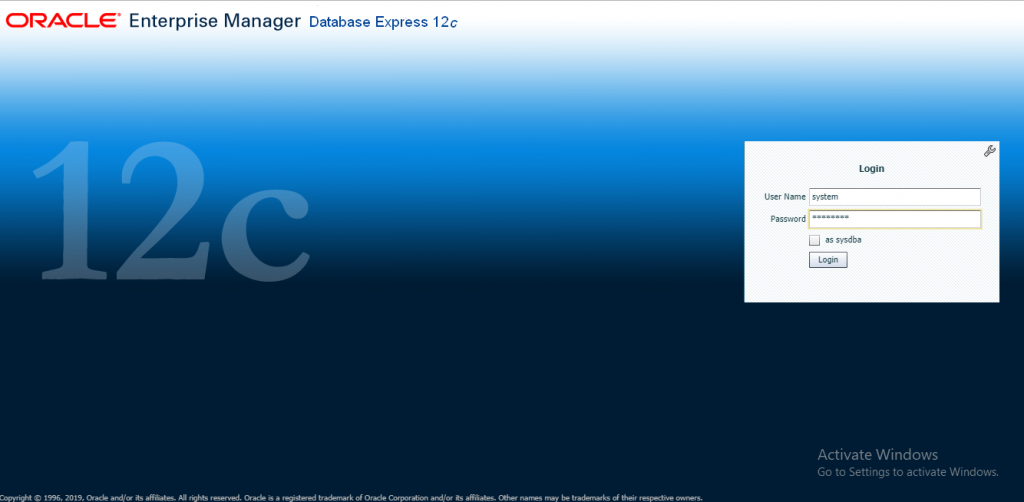
Next, try to access the web-based ‘Oracle Enterprise Manager‘. Open your web browser and type the https URL below on port 5500. Use the IP of your server!
https://10.20.178.69:5500/em/
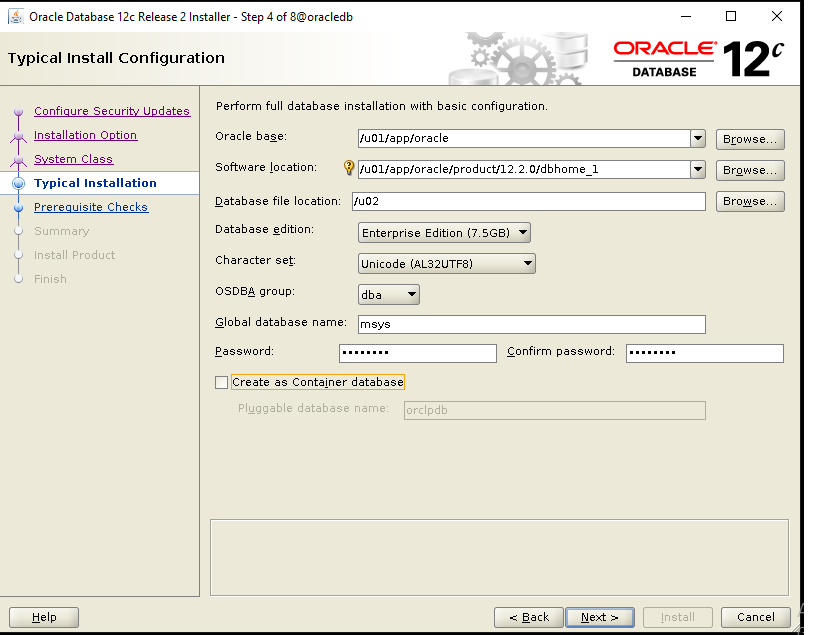
Login with user ‘system‘, and the password you have setup as ‘Administrative Password‘ in step 6 Pic4.
Note:
When web browser is not accessible, need to allow connections from outside the server, you will need to open the following ports:
# firewall-cmd --zone=public --add-port=1521/tcp --add-port=5500/tcp --add-port=5520/tcp --add-port=3938/tcp --permanent
# firewall-cmd --reload
After login, you will see the ‘Oracle Enterprise Manager’ dashboard below.
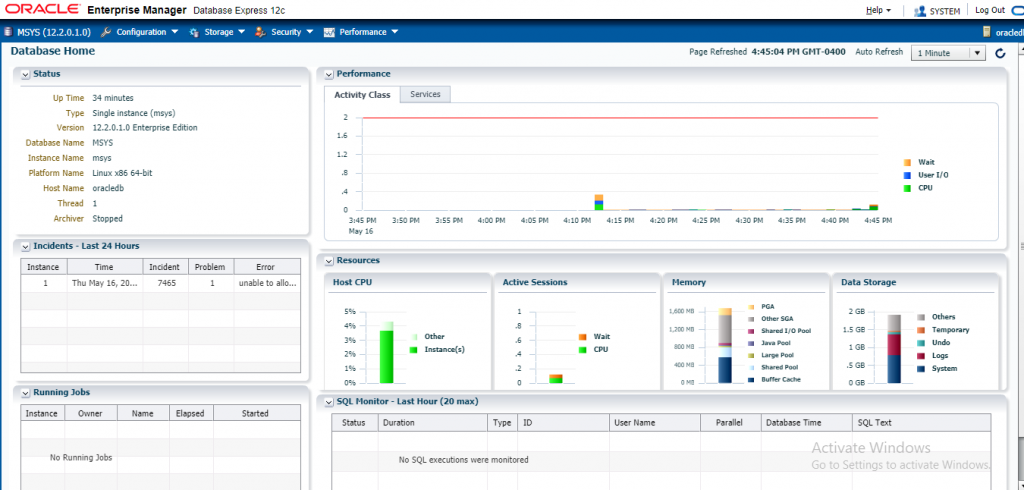
The Oracle Database 12c installation and configuration is done.
Oracle database utility and Oracle Enterprise manager are working.
Step 8 – Installing SLOB [The Simple Database I/O Testing Toolkit for Oracle Database]
Download the latest SLOB package from the below link.
https://kevinclosson.net/slob/
Extract the file using oracle user and continue to use oracle user to setup SLOB,
[oracle@oracledb ~]$ ls
2018.04.16.slob_2.4.2.1.tar.gz
[oracle@oracledb ~]$ tar xvzf 2018.04.16.slob_2.4.2.1.tar.gz
[oracle@oracledb ~]$ ls
2018.04.16.slob_2.4.2.1.tar.gz  SLOB
[oracle@oracledb ~]$ cd SLOB/wait_kit/
[oracle@oracledb wait_kit]$ make all
rm -fr *.o mywait trigger create_sem
cc     -c -o mywait.o mywait.c
cc -o mywait mywait.o
cc     -c -o trigger.o trigger.c
cc -o trigger trigger.o
cc     -c -o create_sem.o create_sem.c
cc -o create_sem create_sem.o
cp mywait trigger create_sem ../
rm -fr *.o
Step 9 – SLOB Configurations
Setup already has Database created in the name“msys” (per step 6 – Pic4 above). Configure the slob.conf file which is located in the SLOB directory
#### SLOB 2.4.0 slob.conf - sample file I used
UPDATE_PCT=50  <== 100% read (0% update), 70/30 read/write (30% update), 50/50 read/write (50% update)
SCAN_PCT=0
RUN_TIME=172800  <== count in seconds that SLOB will run
WORK_LOOP=0
SCALE=8G
SCAN_TABLE_SZ=1M
WORK_UNIT=64
REDO_STRESS=HEAVY
LOAD_PARALLEL_DEGREE=2
SQLNET_SERVICE_BASE=msys   <== mention the database name
SYSDBA_PASSWD="Passw0rd"  <== Administrative Password' created in step 6 Pic4.
Step10: Create tablespaces in MSYS database.
[oracle@oracledb ~]$ sqlplus / as sysdba
SQL*Plus: Release 12.2.0.1.0 Production on Thu May 16 16:55:56 2019
Copyright (c) 1982, 2016, Oracle.  All rights reserved.
Connected to:
Oracle Database 12c Enterprise Edition Release 12.2.0.1.0 - 64bit Production
SQL> select instance_name, instance_role, database_status from v$instance;
INSTANCE_NAME    INSTANCE_ROLE      DATABASE_STATUS
---------------- ------------------ -----------------
msys             PRIMARY_INSTANCE   ACTIVE
SQL> create bigfile tablespace slobdata datafile '/u02/msys/slobdata.dbf' size 128G autoextend on;
Tablespace created.
Step11: Create Database Users and Object for SLOB using user oracle
Note: In this example we are creating 128 SLOB schemas, each with 8GB of data. The size of each schema is controlled by the SCALE parameter in the slob.conf file. 128 8GB schemas will yield 1TB of test data.
[oracle@oracledb SLOB]$ ./setup.sh SLOBDATA 128
SLOB 2.4.0
NOTIFY  : 2019.05.16-17:40:31 :
NOTIFY  : 2019.05.16-17:40:31 : Begin SLOB setup.
NOTIFY  : 2019.05.16-17:40:31 : ADMIN_CONNECT_STRING: "system/Passw0rd"
NOTIFY  : 2019.05.16-17:40:31 : Load parameters from slob.conf:
SCALE: 8G (1048576 blocks)
SCAN_TABLE_SZ: 1M (128 blocks)
LOAD_PARALLEL_DEGREE: 2
ADMIN_SQLNET_SERVICE: ""
SYSDBA_PASSWD: "Passw0rd"
DBA_PRIV_USER: "system"
Note: setup.sh will use the following connect strings as per slob.conf:
Admin Connect String: "system/Passw0rd"
Non-Admin Connect String: " "
NOTIFY  : 2019.05.16-17:40:31 : Testing Admin connect using "sqlplus -L system/Passw0rd"
NOTIFY  : 2019.05.16-17:40:32 : Dropping prior SLOB schemas. This may take a while if there is a large number of old schemas.
NOTIFY  : 2019.05.16-17:40:32 : Previous SLOB schemas have been removed
NOTIFY  : 2019.05.16-17:40:32 : Preparing to load 128 schema(s) into tablespace: SLOBDATA
NOTIFY  : 2019.05.17-07:12:18 : Loading user1 schema
NOTIFY  : 2019.05.17-07:22:42 : Finished loading, indexing and gathering statistics on user1 schema in 624 seconds
NOTIFY  : 2019.05.17-07:22:42 : Commencing multiple, concurrent schema creation and loading
NOTIFY  : 2019.05.17-07:22:43 : Waiting for background batch 1. Loading up to user3
Output EOL:
NOTIFY  : 2019.05.17-09:57:04 : Waiting for background batch 64. Loading up to user128
NOTIFY  : 2019.05.17-09:59:00 : Finished background batch 64. Load / index create / stats gather in 116 seconds
NOTIFY  : 2019.05.17-09:59:00 : Completed concurrent data loading phase: 9378 seconds
NOTIFY  : 2019.05.17-09:59:00 : Creating SLOB procedure
NOTIFY  : 2019.05.17-09:59:01 : SLOB procedure created
NOTIFY  : 2019.05.17-09:59:01 : Row and block counts for SLOB table(s) reported in ./slob_data_load_summary.txt
NOTIFY  : 2019.05.17-09:59:01 : Please examine ./slob_data_load_summary.txt for any possbile errors
NOTIFY  : 2019.05.17-09:59:01 :
NOTIFY  : 2019.05.17-09:59:01 : NOTE: No errors detected but if ./slob_data_load_summary.txt shows errors then
NOTIFY  : 2019.05.17-09:59:01 : examine /home/oracle/SLOB/cr_tab_and_load.out
NOTIFY  : 2019.05.17-09:59:01 : SLOB setup complete. Total setup time:  (10004 seconds)
Step12: Install STATSPACK as SLOB will need to use it.
The script is located at ~$ORACLE_HOME/rdbms/admin
SQL> @/u01/app/oracle/product/12.2.0/dbhome_1/rdbms/admin/spcreate.sql
Session altered.
Choose the PERFSTAT user's password
-----------------------------------
Not specifying a password will result in the installation FAILING
Enter value for perfstat_password: Passw0rd
Passw0rd
Choose the Default tablespace for the PERFSTAT user
---------------------------------------------------
Below is the list of online tablespaces in this database which can
store user data.  Specifying the SYSTEM tablespace for the user's
default tablespace will result in the installation FAILING, as
using SYSTEM for performance data is not supported.
Choose the PERFSTAT users's default tablespace.  This is the tablespace
in which the STATSPACK tables and indexes will be created.
TABLESPACE_NAME                CONTENTS
------------------------------ ---------------------
STATSPACK   DEFAULT   TABLESPACE
----------------------------
SLOBDATA                       PERMANENT
SYSAUX                         PERMANENT
*USERS  PERMANENT
Pressing <return> will result in STATSPACK's recommended default
tablespace (identified by *) being used.
Enter value for default_tablespace: SLOBDATA
Using tablespace SLOBDATA as PERFSTAT default tablespace.
Choose the Temporary tablespace for the PERFSTAT user
-----------------------------------------------------
Below is the list of online tablespaces in this database which can
store temporary data (e.g. for sort workareas).  Specifying the SYSTEM
tablespace for the user's temporary tablespace will result in the
installation FAILING, as using SYSTEM for workareas is not supported.
Choose the PERFSTAT user's Temporary tablespace.
TABLESPACE_NAME                CONTENTS              DB DEFAULT TEMP TABLESPACE
------------------------------ --------------------- --------------------------
TEMP  TEMPORARY *
Pressing <return> will result in the database's default Temporary
tablespace (identified by *) being used.
Enter value for temporary_tablespace:
Using tablespace TEMP as PERFSTAT temporary tablespace.
Output EOL:
Package created.
No errors.
Creating Package Body STATSPACK...
Package body created.
No errors.
NOTE:
SPCPKG complete. Please check spcpkg.lis for any errors.
Step13: Starting SLOB test
To run SLOB, we use the runit.sh script in the SLOB directory. In this example I am going to use all of the 128 schemas I created, and specify one thread per schema:
[oracle@oracledb SLOB]$ ./runit.sh -s 128 -t 1
NOTIFY  : 2019.05.17-10:18:21 : Test has been triggered. Processes are executing.
NOTIFY  : 2019.05.17-10:18:21 : List of monitored sqlplus PIDs written to /tmp/.SLOB.2019.05.17.101722/18481.f_wait_pids.out.
NOTIFY  : 2019.05.17-10:18:31 : Waiting for 172787 seconds before monitoring running processes (for exit).
NOTIFY  : 2019.05.20-14:49:09 : SLOB test is complete.
NOTIFY  : 2019.05.20-14:49:09 : Cleaning up SLOB temporary directory (/tmp/.SLOB.2019.05.20.141756).
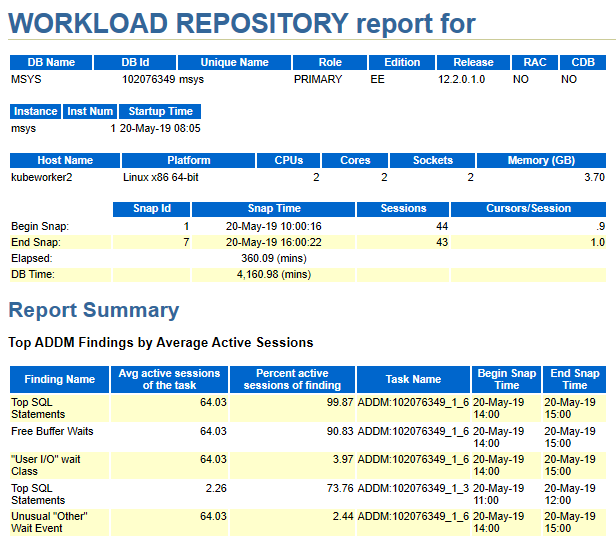
Step14: We can inspect this AWR report to see the I/O observed by Oracle.
You can run AWR reports to see statistics about database performance. Log in with SQLPlus and run:
@$ORACLE_HOME/rdbms/admin/awrrpt.sql
Example below:
[oracle@kubeworker2 SLOB]$ sqlplus / as sysdba
SQL*Plus: Release 12.2.0.1.0 Production on Mon May 20 16:09:32 2019
Copyright (c) 1982, 2016, Oracle.  All rights reserved.
Connected to:
Oracle Database 12c Enterprise Edition Release 12.2.0.1.0 - 64bit Production
SQL> @$ORACLE_HOME/rdbms/admin/awrrpt.sql
Type Specified: html
Final EOL output: Report written to awrrpt_1_1_7.html
The above HTML file can be opened in web browser
Conclusion:
SLOB is a great tool for testing Oracle DB I/O performance.
Created and tested with enough data to exceed the database and stress the array performance.
Use AWR to see what Oracle DB observed as I/O performance.
References:
https://www.howtoforge.com/tutorial/how-to-install-oracle-database-12c-on-centos-7/
https://gruffdba.wordpress.com/2017/03/04/testing-emc-unity-storage-performance-with-slob/