How Do I Setup Ceph Cluster? These 8 Steps will Help You


Audio : Listen to This Blog.
In this blog post, let’s analyze object storage platform called Ceph, which brings object, block, and file storage to a single distributed cluster. We’ll see in detail why we need Ceph, what is part of the Ceph cluster, and how it redefines object storage.
What Is Ceph?
Ceph is an open-source, software-defined, unified storage platform (Object + Block + File). It’s a massively scalable and high-performing distributed storage system without any single point of failure.
Why We Need Ceph Cluster?
If we want to provide Ceph Object Storage and/or Ceph Block Device service to a cloud platform, deploy Ceph File System. For using Ceph for any other purpose, we need Ceph Cluster, which consists of Ceph Nodes.
Architecture of Ceph

The architecture follows the following principles:
- Every component must be scalable.
- There can be no single point of failure.
- The solution must be software-defined, open-source, and adaptable.
- Ceph software should run on readily available commodity hardware.
- Everything must be self-managed wherever possible.
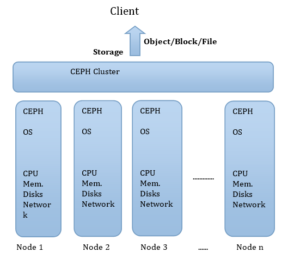
Ceph Cluster
Basic Components of a Ceph Cluster
A Ceph Storage Cluster requires at least one Ceph Monitor and at least two Ceph OSD Daemons. In case we are running Ceph File System Client, we need Ceph Meta Data Server also.
Roles of these components
- Ceph OSDs: Ceph OSD Daemon stores data and handles replication, recovery, backfilling, rebalancing; it also provides some monitoring information to Ceph Monitors. Since two copies of the data is created by default, the cluster requires at least two Ceph OSD Daemons. It’s recommended to have one OSD per disk.
- Monitors: A Ceph Monitor maintains the map of the cluster state, i.e., Monitor map, OSD map, Placement Group map, and the CRUSH map. It also maintains the history of each state change in Ceph Monitor, OSD Daemons, and Placement Groups.
- MDs: A Ceph Metadata Server (MDS) stores metadata on behalf of the Ceph File System.
Data Placement
Ceph stores data as objects within storage pools; it uses CRUSH algorithm to figure out which placement group should contain the object and further calculates which Ceph OSD Daemon should store the Placement Group. The Crush algorithm enables the Ceph Storage cluster to scale, re-balance, and recover dynamically.
Ceph Cluster Creation
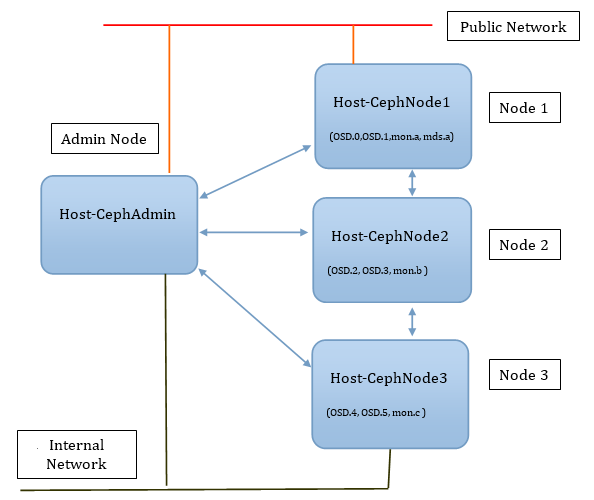 Fig2: Above diagram shows different nodes with instances of OSD, Monitors, and MDS in it.
8 Steps to Setup Ceph Cluster
1. Host/VM Configurations
Create four virtual machines (Host-CephAdmin, Host-CephNode1, Host-CephNode2, Host-CephNode3) each with below Configurations.
- One CPU core
- 512 MB of RAM
- Ubuntu 12.04 with latest updates
- Three virtual disks (28 GB OS disk with boot partition, two 8GB disk for Ceph data)
- Two virtual network interfaces:
1. Eth0 host-only interface for Ceph data exchange
2. Eth1 NAT interface for communication with public network
2. Nodes Preparation
Install open-ssh on all nodes of the cluster.
- Create the “ubuntu” user on each node.
1	root@Host-CephAdmin:~# useradd -d /home/ubuntu -m ubuntu
2	root@Host-CephAdmin:~# passwd ubuntu
- Give all privilege to user “ubuntu” by appending below the line to /etc/sudoers file (use visudo command to edit this file). ubuntu ALL=(ALL) NOPASSWD:ALL
- Configure root on the server nodes to ssh between nodes using authorized keys without a set password. Use ssh-keygen to generate the public key and then copy it to different nodes using ssh-copy-id.
- To resolve host names, edit /etc/hosts file to have the names and IP of all the hosts. This file is copied to all hosts.
1	ubuntu@Host-CephAdmin:~$ cat /etc/hosts
2	127.0.0.1       localhost
3	192.168.1.1     Host-CephAdmin
4	192.168.1.2     Host-CephNode1
5	192.168.1.3     Host-CephNode2
6	192.168.1.4     Host-CephNode3
3. Ceph Installation on all Hosts/VMs
Ceph Bobtail release was installed on all the hosts. Below steps were followed to install it.
a. Add the release key
1	root@Host-CephAdmin:~#wget -q -O-
2	'https://ceph.com/git/?p=ceph.git;a=blob_plain;f=keys/release.asc' |
3	apt-key add -
b. Add the Ceph Package to our repository
root@Host-CephAdmin:~#echo deb http://ceph.com/debian-bobtail/ $(lsb_release -sc) main |
 tee /etc/apt/sources.list.d/ceph.list
c. Update our repository and install ceph
1 root@Host-CephAdmin:~#apt-get update && apt-get install ceph
4. Ceph Configuration
a. Create the Ceph Configuration file /etc/ceph/ceph.conf in Admin node (Host-CephAdmin) and then copy it to all the nodes of the cluster.
1	root@Host-CephAdmin:~# cat /etc/ceph/ceph.conf
2	[global]
3	auth cluster required = none
4	auth service required = none
5	auth client required = none
6	[osd]
7	osd journal size = 1000
8	filestore xattr use omap = true
9	osd mkfs type = ext4
10	osd mount options ext4 = user_xattr,rw,noexec,nodev,noatime,nodiratime
11	[mon.a]
12	host = Host-CephNode1
13	mon addr = 192.168.1.2:6789
14	[mon.b]
15	host = Host-CephNode2
16	mon addr = 192.168.1.3:6789
17	[mon.c]
18	host = Host-CephNode3
19	mon addr = 192.168.1.4:6789
20	[osd.0]
21	host =  Host-CephNode1
22	devs =  /dev/sdb
23	[osd.1]
24	host = Host-CephNode1
25	devs =  /dev/sdc
26	[osd.2]
27	host = Host-CephNode2
28	devs =  /dev/sdb
29	[osd.3]
30	host = Host-CephNode2
31	devs =  /dev/sdc
32	[osd.4]
33	host = Host-CephNode3
34	devs =  /dev/sdb
35	[osd.5]
36	host = Host-CephNode3
37	devs =  /dev/sdc
38	[mds.a]
39	host = Host-CephNode1
The ceph.conf file created above describes the composition of the entire Ceph cluster, including which hosts are participating, which daemons run where, and which paths are used to store file system data or metadata.
b. Create the Ceph Daemon working directories on each cluster nodes
1	ubuntu@Host-CephAdmin:~$ ssh Host-CephNode1 sudo mkdir -p /var/lib/ceph/osd/ceph-1
2	ubuntu@Host-CephAdmin:~$ ssh Host-CephNode2 sudo mkdir -p /var/lib/ceph/osd/ceph-2
3	ubuntu@Host-CephAdmin:~$ ssh Host-CephNode2 sudo mkdir -p /var/lib/ceph/osd/ceph-3
4	ubuntu@Host-CephAdmin:~$ ssh Host-CephNode3 sudo mkdir -p /var/lib/ceph/osd/ceph-4
5	ubuntu@Host-CephAdmin:~$ ssh Host-CephNode3 sudo mkdir -p /var/lib/ceph/osd/ceph-5
6	ubuntu@Host-CephAdmin:~$ ssh Host-CephNode1 sudo mkdir -p /var/lib/ceph/mon/ceph-a
7	ubuntu@Host-CephAdmin:~$ ssh Host-CephNode2 sudo mkdir -p /var/lib/ceph/mon/ceph-b
8	ubuntu@Host-CephAdmin:~$ ssh Host-CephNode3 sudo mkdir -p /var/lib/ceph/mon/ceph-c
9	ubuntu@Host-CephAdmin:~$ ssh Host-CephNode1 sudo mkdir -p /var/lib/ceph/mds/ceph-a
5. Ceph File System
Lets create an empty Ceph file system spanning across three nodes (Host-CephNode1, Host-CephNode2, and Host-CephNode3) by executing command mkcephfs on server node. Mkcephfs is used with -a option, so it will ssh and scp to connect to remote hosts on our behalf and do the setup of the entire cluster.
1	ubuntu@Host-CephAdmin:~$ ssh Host-CephNode1
2	Welcome to Ubuntu 12.04.2 LTS (GNU/Linux 3.5.0-23-generic i686)
3	* Documentation:  https://help.ubuntu.com/
4	488 packages can be updated.
5	249 updates are security updates.
6	New release '14.04.1 LTS' available.
7	Run 'do-release-upgrade' to upgrade to it.
8	Last login: Fri Feb 13 16:45:51 2015 from host-cephadmin
9	ubuntu@Host-CephNode1:~$ sudo -i
10	root@Host-CephNode1:~#cd /etc/ceph
11	root@Host-CephNode1:/etc/ceph# mkcephfs -a -c /etc/ceph/ceph.conf -k ceph.keyring --mkfs
6. Start the Ceph Cluster
On a server node, start the Ceph service:
1 root@Host-CephNode1:/etc/ceph# service ceph -a start
7. Verify Cluster Health
If the command “ceph health” returns HEALTH_OK then cluster is healthy.
1	root@Host-CephNode1:/etc/ceph# ceph health
2	HEALTH_OK
8. Verify Cluster Status
The following command will give details of the cluster
1	root@Host-CephNode1:/etc/ceph# ceph status
2	health HEALTH_OK
3	monmap e1: 3 mons at {a=192.168.1.2:6789/0,b=192.168.1.3:6789/0,c=192.168.1.4:6789/0},
election epoch 64, quorum 0,1,2 a,b,c
4	osdmap e58: 6 osds: 6 up, 6 in
5	pgmap v4235: 1344 pgs: 1344 active+clean; 53691 KB data, 7015 MB used, 38907 MB / 48380 MB
avail
6	mdsmap e30: 1/1/1 up {0=a=up:active}
Once we have done the above steps, we should have Ceph Cluster up and running. Now we can perform some basic operations on it.
Ceph’s Virtual Block device
Rbd is a utility used to manage Rados Block Device (RBD) images, used by the Linux rbd driver and rbd storage driver for Qemu/KVM. RBD images are simple block devices that are striped over objects and stored by the Ceph Distributed Object Store (RADOS). As a result, any read or write to the image is distributed across many nodes in the cluster, generally preventing any node from becoming a bottleneck when the individual images gets larger.
1	root@Host-CephNode1:/etc/ceph# rbd ls
2	rbd: pool rbd doesn't contain rbd images
Below are the commands to create RBD image and map to Kernel
1	root@Host-CephNode1:/etc/ceph# rbd create MsysLun --size 4096
2	root@Host-CephNode1:/etc/ceph# rbd ls -l
3	NAME     SIZE PARENT FMT PROT LOCK
4	MsysLun 1024M          1
5
6	root@Host-CephNode1:/etc/ceph# modprobe rbd
1. Map the image
1	root@Host-CephNode1:~# rbd map MsysLun --pool rbd
2	root@Host-CephNode1:~# sudo rbd showmapped
3	id pool image   snap device
4	1  rbd  MsysLun -    /dev/rbd1
5	root@Host-CephNode1:~# ls -l /dev/rbd1
6	brw-rw---- 1 root disk 251, 0 Feb 13 17:27 /dev/rbd1
7	root@Host-CephNode1:~# ls -l /dev/rbd
8	total 0
9	drwxr-xr-x 2 root root 60 Feb 13 17:20 rbd
10	root@Host-CephNode1:~# ls -l /dev/rbd/rbd
11	total 0
12	lrwxrwxrwx 1 root root 10 Feb 13 17:27 MsysLun -> ../../rbd1
2. Create file system and Mount the device locally
1	root@Host-CephNode1:~#mkdir /mnt/MyLun
2	root@Host-CephAdmin:~# mkfs.ext4 -m0 /dev/rbd/rbd/MsysLun
3	mke2fs 1.42 (29-Nov-2011)
4	....
5	....
6	Creating journal (32768 blocks): done
7	Writing superblocks and filesystem accounting information: done
8	root@Host-CephAdmin:~# mount /dev/rbd/rbd/MsysLun /mnt/MyLun
3. Write some data to the filesystem
1	root@Host-CephAdmin:~# dd if=/dev/zero of=/mnt/MyLun/CephtestFile bs=4K count=100
2	100+0 records in
3	100+0 records out
4	409600 bytes (410 kB) copied, 0.00207755 s, 197 MB/s
5	root@Host-CephAdmin:~# ls -l /mnt/MyLun/CephtestFile
6	-rw-r--r-- 1 root root 409600 Feb 17 16:38 /mnt/MyLun/CephtestFile
Ceph Distributed File System
1. Mount the root file system of Ceph cluster nodes to the Admin node
1	root@Host-CephAdmin:~# mkdir /mnt/CephFSTest
2	root@Host-CephAdmin:~# mount.ceph Host-CephNode1,Host-CephNode2,,Host-CephNode3:/
 /mnt/CephFSTest
3	root@Host-CephAdmin:~# df -h | grep mnt
4	/dev/rbd1                              4.0G  137M  3.9G   4% /mnt/MyLun
5	192.168.1.2,192.168.1.3,192.168.1.4:/   48G  9.6G   38G  21% /mnt/CephFSTest
2. Write Some data to it
1	root@Host-CephAdmin:~# dd if=/dev/zero of=/mnt/CephFSTest/test-file bs=4K count=100
2	100+0 records in
3	100+0 records out
4	409600 bytes (410 kB) copied, 0.00395152 s, 104 MB/s
5	root@Host-CephAdmin:~# ls -l /mnt/CephFSTest
6	total 400
7	-rw-r--r-- 1 root root 409600 Feb 17 16:47 test-file
Ceph should now be set up and working properly. If you have questions, please share them through comments.