Learn how to automate cloud infrastructure with ceph storage


Audio : Listen to This Blog.
The success of virtual machines (VM) is well known today with its mass adoption everywhere. Today we have well-established workflows and tool sets to help manage VM life cycles and associated services. The proliferation and growth of this cycle, ultimately led to cloud deployments. Amazon Web Services and Google Cloud Engines are a few of the dozens of service providers today, who offer terms and services that make provisioning VMs anywhere easier. Both with the proliferation of cloud providers and the scale of cloud, comes today’s newer set of problems. Configuration management and provisioning of those VMs has become a nightmare. While one side of physical infrastructure dependency has been virtually eliminated it has resulted in another domain of configuration management of those VMs (and clusters) that needs to be addressed. A slew of tool sets came out to address them. Chef, Puppet, Ansible, Salt- Stack are widely known and used everywhere. SaltStack being the latest entrant to this club. Given our Python background, we look at SaltStack as a Configuration Management tool. We also used another new entrant Terraform for provisioning VMs needed in the cluster, and bootstrapping them to run Saltstack.
Introduction
With a proliferation of cloud providers providing Infrastructure as a service, there has been a constant innovation to deliver more. Microsoft Azure, Amazon Web Services, Google Cloud Engine are to name a few here. This has resulted in Platform as a Service model, where in not just the infrastructure is managed, but more tools/workflows were defined to enable application development and deployment easier. Google App Engine was one of the earliest success stories here. Nevertheless, for any user of these cloud platform resulted in several headaches.
- Vendor lock-in of technologies since services and interfaces for cloud are not a standard.
- Re-creation of platform from development to elsewhere was a pain.
- Migration from one cloud provider to another was nightmare.
The need for the following requirements, flow from earlier pain points and dawned on everyone using cloud deployments:
- A Specification for infrastructure so it can be captured and restored as need be. By infrastructure we do consider a cluster of VMs and associated services. So network configuration, high availability and other services as dictated by the service provider had to be captured.
- A way for the bootstrap logic and configuration on those infrastructure needs to be captured.
- And configuration captured should ideally be agnostic to the cloud provider.
- All of this, in a tool that is understood by everyone, so its simple and easily adaptable are major plus.
When I looked at the suite of tools, Ruby, Ruby on Rails were alien to me. Python was native. Saltstack had some nice features that we could really consider. If Saltstack can bootstrap and initialize resources, Terraform can help customize external environments as well. Put them to work together and we do see a great marriage on the cards. But will they measure up? Let us brush through some of their designs and get to a real life scenario and see how they scale up indeed.
2 Our Cloud Toolbox
2.1 Terraform
Terraform is a successor to Vagrant from the stable of Hashicorp. Vagrant brought spawning of VMs to developers a breeze. The key tenets of Vagrant that made it well loved are its ability to perform lightweight, reproducible and portable environments. Today, the power of Vagrant is well known. As I see it, the need for bootstrapping a distributed cluster applications was not easily doable with it. So we have Terraform from the same makers, who understood the limitations of Vagrant and enabled it to achieve bootstrapping clustered environments easier. Terraform defines extensible providers, that encapsulates connectivity information specific to each cloud provider. Terraform defines resources that encapsulate services from each cloud provider. And each resource could be extended by one or more provisioners. Provisioner has the same concept as in Vagrant but is much more extensible. Provisioner in Vagrant can only provision newly created VMs. But here enters the power of Terraform.
Terraform has support for local-exec and remote-exec, through which one can automate extensible scripts through them either locally or on remote ma- chines. As the name implies, local-exec, runs locally on the node where the script is invoked, while remote-exec executes in the targeted remote machine. And several property of the new VM are readily available. And additional custom attributes can be defined through output specification as well. Ad- ditionally, there exists a null-resource, which is pseudo resource along with explicit dependencies support that transforms Terraform to a powerhouse. All of these provide much greater flexibility with setting up complex environments outside of just provisioning and bootstrapping VMs.
A better place to understand Terraform in all its glory would be to visit their doc page \cite{Terraform}: [3].
2.2 SaltStack
SaltStack is used to deploy, manage and automate infrastructure and applica- tions at cloud scale. SaltStack is written over Python and uses Jinja template engine. SaltStack is architect-ed to have a Master node and one or more Minion nodes. Multiple Master Nodes can also be setup to create a High Available environment. SaltStack brings some newer terminology with it that needs some familiarity. But once it is understood, it is fairly easy to use it to suit our pur- pose. I shall briefly touch upon SaltStack here, and would rightly point to their rich source of documentation here \cite{SaltStack}: [4].
To put it succinctly, Grains are read-only key-value attributes of Minions. All Minions export their immutable attributes to SaltMaster as Grains. As an example, one can find cpu speed, cpu make, cpu cores, memory capacity, disk capacity, os flavor, version, network cards and many more all available part of that nodes Grains. Pillar is part of SaltMaster, holding all customization needed over the cluster. Configuration kept part of Pillar can be targeted to minions, and only those minions will have that information available. To help with an example, using Pillar one can define two sets of users/groups to be configured on nodes in the cluster. Minion nodes that are part of Finance do- main, will have one set of users applied, while those part of Dev domain will have another set. User/Group definition is defined once in the SaltMaster as a Pillar file, and can be targeted based on Minion nodes domainname, part of its Grain. Few other examples would be package variations across distributions can be handled easily. Any Operations person can easily relate to nightmare for automating a simple request to install Apache Webserver on any Linux dis- tribution (Hint: the complexity lies in the non-standard Linux distributions). Pillar is your friend in this case. All of this configuration part of either Pil- lar or Salt State are confusingly though written in the same file format(.sls) and are called Salt States. These Salt State Files (.sls) specify the configura- tion to be applied either explicitly, or through Jinja templating. A top level state file at both Pillar [default location: /srv/pillar/top.sls] and State [default location: /srv/state/top.sls] exists, wherein targeting of configuration can be accomplished.
3 Case Study
Let us understand the power of Terraform and SaltStack together in action, for a real life deployment. Ceph is an open source distributed storage cluster. Needless to say, setting up Ceph cluster is a challenge even with all the documents available \cite{Ceph Storage Cluster Setup}: [6]. Even while using ceph-deploy script, one needs to satisfy pre-flight pre-requisites before it can be used. This case study shall first setup a cluster with prerequisites met and then use ceph-deploy over it, to bring up the ceph cluster.
Let us try to use the power of tools we have chosen and summarize our findings while setting up Ceph Cluster. Is it really that powerful and easy to create and replicate the environment anywhere? Let us find out.
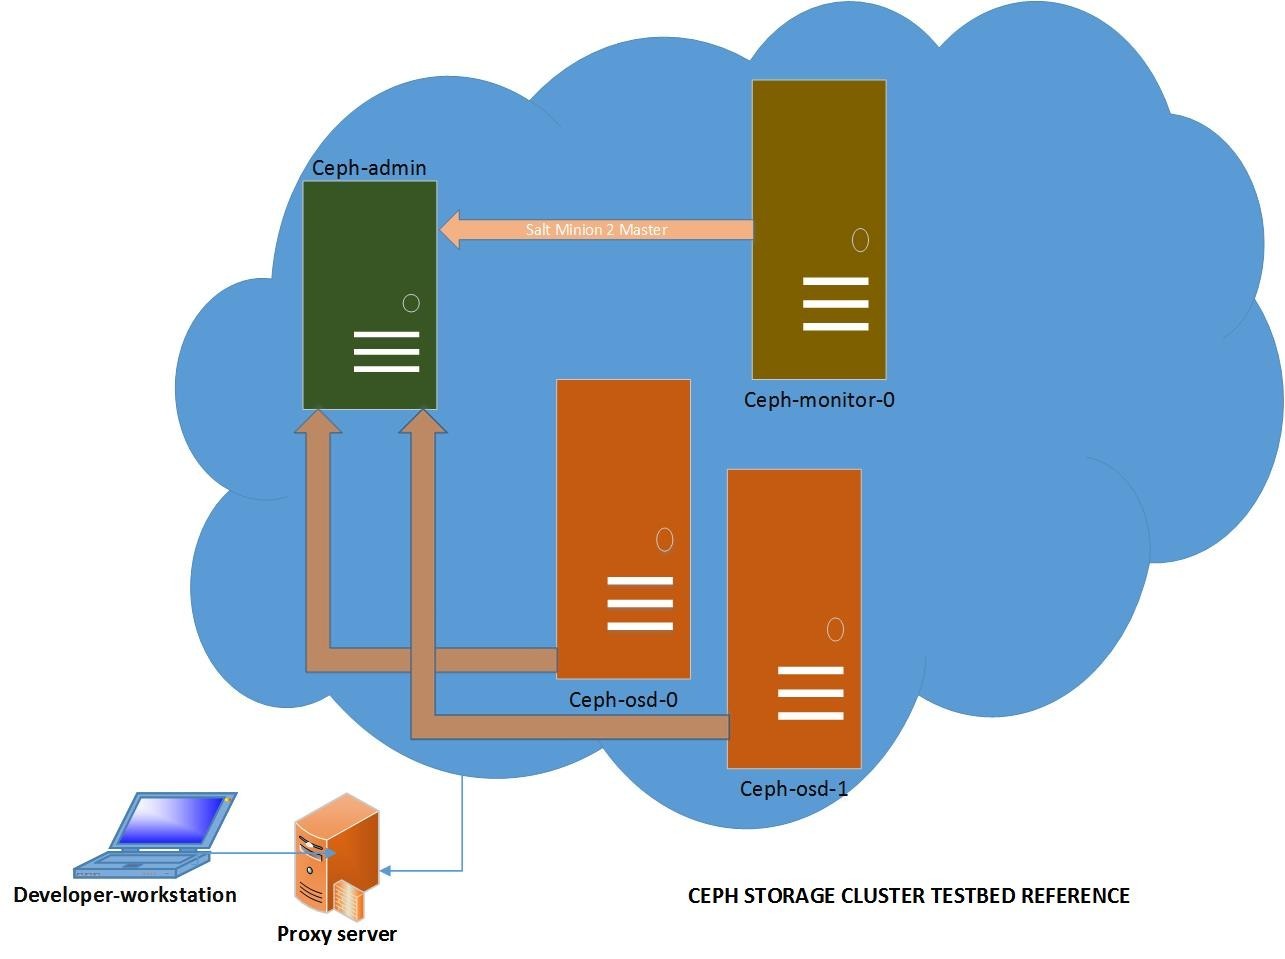
We shall replicate a similar setup as provided in the ceph documentation
[Figure: 1]. We shall have 4 VM nodes in the cluster, ceph-admin, ceph-monitor-
0, ceph-osd-0 and ceph-osd-1. Even though in our cluster, we have only a single ceph-monitor node, I have suffix’d it with an instance number. This is to allow later expansion of monitors as needed, since ceph does allow multiple monitor nodes too. It is assumed that the whole setup is being created from ones personal desktop/laptop environment, which is behind a company proxy and cannot act as SaltMaster. We shall use Terraform to create the needed VMs and bootstrap them with appropriate configuration to run either as Salt Master or Salt Minion. ceph-admin node shall act as a Salt Master Node as well and hold all configuration necessary to install, initialize and bring up the whole cluster.
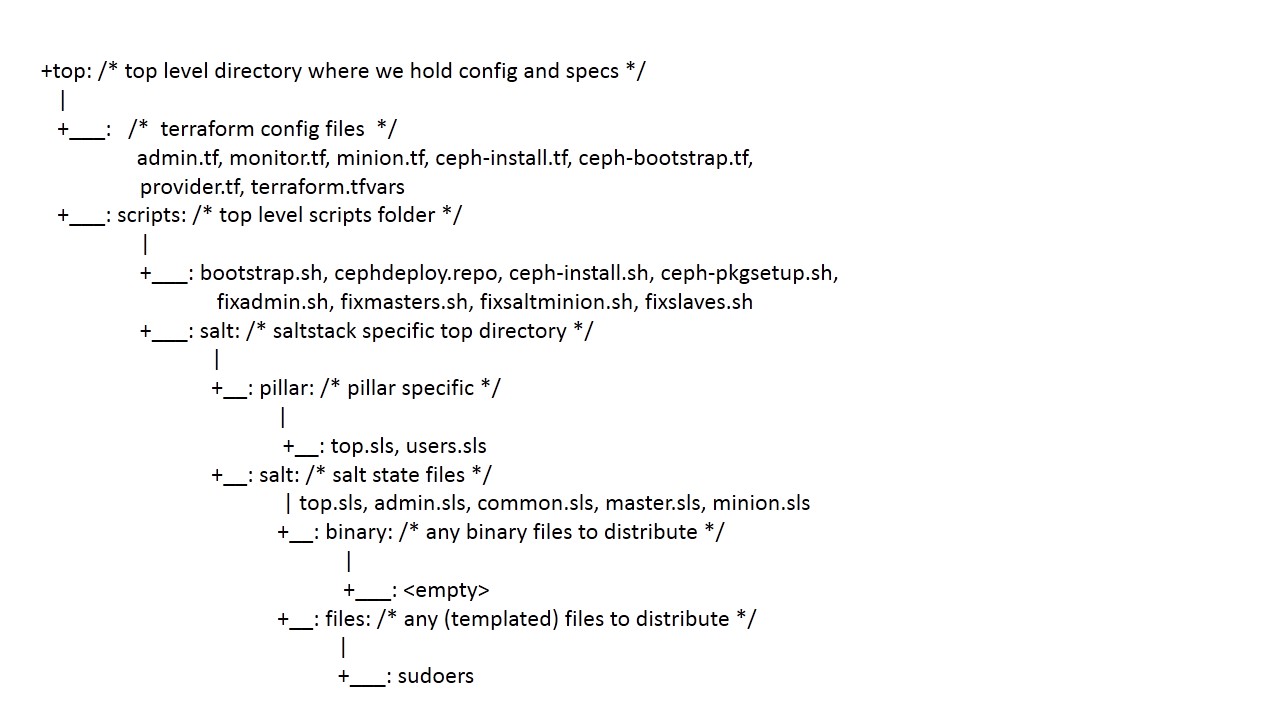
3.1 Directory structure
We shall host all files in the below directory structure. This structure is assumed in scripts. The files are referenced below in greater details.
We shall use DigitalOcean as our cloud provider for this case study. I am assuming the work machine is signed up with DigitalOcean to enable automatic provisioning of systems. I will use my local workmachine to this purpose. To work with DigitalOcean and provision VMs automatically, there are two steps involved.
- Create a Personal Access Token(PAN), which is a form of authentication token to enable auto provisioning resources. \cite{DigitalOceanPAN}:[7]. The key created has to saved securely, as it cannot be recovered again from their console.
- Use the PAN to add the public key of local workmachine to enable auto lo- gin into newly provisioned VMs easily \cite{DigitalOceanSSH}:[8]. This is necessary to allow passwordless ssh sessions, that enable further cus- tomization auto-magically on those created VMs.The next step is to define these details part of terraform, let us name this file provider.tf.
variable "do_token" {}
variable "pub_key" {}
variable "pvt_key" {}
variable "ssh_fingerprint" {}
provider "digitalocean" {
 token = "${var.do_token}"
}
The above defines input variables that needs to be properly setup for provision- ing services with a particular cloud provider. do token is the PAN obtained during registration from DigitalOcean directly. The other three properties are used to setup the VMs provisioned to enable auto login into them from our local workmachine. The ssh fingerprint can be obtained by running ssh-keygen as below.
user@machine> ssh-keygen -lf ~/.ssh/myrsakey.pub
2048 00:11:22:33:44:55:66:77:88:99:aa:bb:cc:dd:ee:ff /home/name/.ssh/myrsakey.pub (RSA)
The above input variables, can be assigned values in a file, so they will be automatically initialized instead of requesting end users every time scripts are invoked. The special file which Terraform looks for initializing the input vari- ables are terraform.tfvars. Below would be a sample content of that file.
do_token="07a91b2aa4bc7711df3d9fdec4f30cd199b91fd822389be92b2be751389da90e"
pub_key="/home/name/.ssh/id_rsa.pub"
pvt_key="/home/name/.ssh/id_rsa"
ssh_fingerprint="0:11:22:33:44:55:66:77:88:99:aa:bb:cc:dd:ee:ff"
The above settings should ensure successful connection with DigitalOcean cloud provider and enable one to provision services through automation scripts.
3.2 Ceph-Admin
Now let us spawn and create a VM to act as our Ceph-Admin node. For each node type, let us create a separate terraform file to hold the configuration. It is not a must, but it helps keep sanity while perusing code and is self-explanatory.
For Ceph-Admin we have captured bootstrapping part of Terraform config- uration. While the rest of the nodes configuration is captured part of Salt state files. It is possible to run salt minion in Ceph-Admin node as well, and ap- ply configuration. We instead chose Terraform for bootstrapping Ceph Admin totally, to help us understand both ways. In either case, the configuration is cap- tured part of spec and is readily replicable anywhere. The power of Terraform is just not with configuration/provisioning of VMs but external environments as well.
The Ceph-Admin node, shall not only satisfy Ceph cluster installation pre- requisites, but have Salt Master running on it as well. It shall have two users defined, cephadm with sudo privileges over the entire cluster, and demo user. The ssh keys are generated everytime the cluster is provisioned without caching and replicating the keys. Also the user profile is replicated on all nodes in the cluster. The Salt configuration and state files have to setup additionally. Setting up this configuration file based on the attributes of the provisioned cluster has a dependency here. This dependency is very nicely handled through Terraform by their null resources and explicit dependency chains.
3.2.1 admin.tf – Terraform Listing
Below is listed admin.tf that holds configuration necessary to bring up ceph- admin node with embedded comments
# resource maps directly to services provided by cloud providers.
# it is always of the form x_y, wherein x is the cloud provider and y is the targeted service.
# the last part that follows is the name of the resource.
# below initializes attributes that are defined by the cloud provider to create VM.
resource "digitalocean_droplet" "admin" {
 image = "centos-7-0-x64"
 name = "ceph-admin"
 region = "sfo1"
 size = "1gb"
 private_networking = true
 ssh_keys = [
 "${var.ssh_fingerprint}"
 ]
# below defines the connection parameters necessary to do ssh for further customization.
# For this to work passwordless, the ssh keys should be pre-registered with cloud provider.
 connection {
 user = "root"
 type = "ssh"
 key_file = "${var.pvt_key}"
 timeout = "10m"
 }
# All below provisioners, perform the actual customization and run
# in the order specified in this file.
# "remote-exec" performs action on the remote VM over ssh.
# Below one could see some necessary directories are being created.
 provisioner "remote-exec" {
 inline = [
 "mkdir -p /opt/scripts /srv/salt /srv/pillar",
 "mkdir -p /srv/salt/users/cephadm/keys /srv/salt/users/demo/keys"',
 "mkdir -p /srv/salt/files",
 ]
 }
# "file" provisioner copies files from local workmachine (where the script is being run) to
# remote VM. Note the directories should exist, before this can pass.
# The below copies the whole directory contents from local machine to remote VM.
# These scripts help setup the whole environment and can be depended to be available at
# /opt/scripts location. Note, the scripts do not have executable permission bits set.
# Note the usage of "path.module", these are interpolation extensions provided by Terraform.
 provisioner "file" {
 source = "${path.module}/scripts/"
 destination = "/opt/scripts/"
 }
# A cephdeploy.repo file has to be made available at yum repo, for it to pick ceph packages.
# This requirement comes from setting up ceph storage cluster.
 provisioner "file" {
 source = "${path.module}/scripts/cephdeploy.repo"
 destination = "/etc/yum.repos.d/cephdeploy.repo"
 }
# Setup handcrafted custom sudoers file to allow running sudo through ssh without terminal connection.
# Also additionally provide necessary sudo permissions to cephadm user.
 provisioner "file" {
 source = "${path.module}/scripts/salt/salt/files/sudoers"
 destination = "/etc/sudoers"
 }
# Now, setup yum repos and install packages as necessary for Ceph admin node.
# Additionally ensure salt-master is installed.
# Create two users, cephadm privileged user with sudo access for managing the ceph cluster and demo guest user.
# The passwords are also set accordingly.
# Remember to set proper permissions to the scripts.
# The provisioned VM attributes can be easily used to customize several properties as needed. In our case,
# the IP address (public and private), VM host name are used to customize the environment further.
# For ex: hosts file, salt master configuration file and ssh_config file are updated accordingly.
 provisioner "remote-exec" {
 inline = [
 "export PATH=$PATH:/usr/bin",
 "chmod 0440 /etc/sudoers",
 "yum install -y epel-release yum-utils",
 "yum-config-manager --enable cr",
 "yum install -y yum-plugin-priorities",
 "yum clean all",
 "yum makecache",
 "yum install -y wget salt-master",
 "cp -af /opt/scripts/salt/* /srv",
 "yum install -y ceph-deploy --nogpgcheck",
 "yum install -y ntp ntpdate ntp-doc",
 "useradd -m -G wheel cephadm",
 "echo \"cephadm:c3ph@dm1n\" | chpasswd",
 "useradd -m -G docker demo",
 "echo \"demo:demo\" | chpasswd",
 "chmod +x /opt/scripts/*.sh",
 "/opt/scripts/fixadmin.sh ${self.ipv4_address} ${self.ipv4_address_private} ${self.name}",
 ]
 }
}
3.2.2 Dependency scripts – fixadmin.sh
Below we list the scripts referenced from above Terraform file. fixadmin.sh script will be used to customize the VM further after creation. This script shall per- form the following functions. It shall update cluster information in /opt/nodes directory, to help further customization to know the cluster attributes (read net- work address etc). Additionally, it patches several configuration files to enable automation without intervention.
#!/bin/bash
# Expects ./fixadmin.sh
# Performs the following.
# a. caches cluster information in /opt/nodes
# b. patches /etc/hosts file to connect through private-ip for cluster communication.
# c. patches ssh_config file to enable auto connect without asking confirmation for given node.
# d. creates 2 users, with appropriate ssh keys
# e. customize salt configuration with cluster properties.
mkdir -p /opt/nodes
chmod 0755 /opt/nodes
echo "$1" > /opt/nodes/admin.public
echo "$2" > /opt/nodes/admin.private
rm -f /opt/nodes/masters*
sed -i '/demo-admin/d' /etc/hosts
echo "$2 demo-admin" >> /etc/hosts
sed -i '/demo-admin/,+1d' /etc/ssh/ssh_config
echo "Host demo-admin" >> /etc/ssh/ssh_config
echo " StrictHostKeyChecking no" >> /etc/ssh/ssh_config
for user in cephadm demo; do
 rm -rf /home/${user}/.ssh
 su -c "cat /dev/zero | ssh-keygen -t rsa -N \"\" -q" ${user}
 cp /home/${user}/.ssh/id_rsa.pub /srv/salt/users/${user}/keys/key.pub
 cp /home/${user}/.ssh/id_rsa.pub /home/${user}/.ssh/authorized_keys
done
systemctl enable salt-master
systemctl stop salt-master
sed -i '/interface:/d' /etc/salt/master
echo "#script changes below" >> /etc/salt/master
echo "interface: ${2}" >> /etc/salt/master
systemctl start salt-master
3.2.3 Dependency – Ceph yum repo spec
[ceph-noarch]
name=Ceph noarch packages
baseurl=http://download.ceph.com/rpm-hammer/el7/noarch
enabled=1
gpgcheck=1
type=rpm-md
gpgkey=https://download.ceph.com/keys/release.asc
3.3 Ceph-Monitor
# resource specifies the attributes required to bring up ceph-monitor node.
# Note have the node name has been customized with an index, and the usage of 'count'
# 'count' is a special attribute that lets one create multiple instances of the same spec.
# That easy!
resource "digitalocean_droplet" "master" {
 image = "centos-7-0-x64"
 name = "ceph-monitor-${count.index}"
 region = "sfo1"
 size = "512mb"
 private_networking = true
 ssh_keys = [
 "${var.ssh_fingerprint}"
 ]
 count=1
 connection {
 user = "root"
 type = "ssh"
 key_file = "${var.pvt_key}"
 timeout = "10m"
 }
 provisioner "remote-exec" {
 inline = [
 "mkdir -p /opt/scripts /opt/nodes",
 ]
 }
 provisioner "file" {
 source = "${path.module}/scripts/"
 destination = "/opt/scripts/"
 }
 # This provisioner has implicit dependency on admin node to be available.
 # below we use admin node's property to fix ceph-monitor's salt minion configuration file,
 # so it can reach salt master.
 provisioner "remote-exec" {
 inline = [
 "export PATH=$PATH:/usr/bin",
 "yum install -y epel-release yum-utils",
 "yum-config-manager --enable cr",
 "yum install -y yum-plugin-priorities",
 "yum install -y salt-minion",
 "chmod +x /opt/scripts/*.sh",
 "/opt/scripts/fixsaltminion.sh ${digitalocean_droplet.admin.ipv4_address_private} ${self.name}",
 ]
 }
}
3.4 Ceph-Osd
resource "digitalocean_droplet" "minion" {
    image = "centos-7-0-x64"
    name = "ceph-osd-${count.index}"
    region = "sfo1"
    size = "1gb"
    private_networking = true
    ssh_keys = [
      "${var.ssh_fingerprint}"
    ]
        # Here we specify two instances of this specification. Look above though the
        # hostnames are customized already by using interpolation.
    count=2
  connection {
      user = "root"
      type = "ssh"
      key_file = "${var.pvt_key}"
      timeout = "10m"
  }
  provisioner "remote-exec" {
    inline = [
      "mkdir -p /opt/scripts /opt/nodes",
    ]
  }
  provisioner "file" {
     source = "${path.module}/scripts/"
     destination = "/opt/scripts/"
  }
  provisioner "remote-exec" {
    inline = [
      "export PATH=$PATH:/usr/bin",
      "yum install -y epel-release yum-utils yum-plugin-priorities",
      "yum install -y salt-minion",
      "chmod +x /opt/scripts/*.sh",
      "/opt/scripts/fixsaltminion.sh ${digitalocean_droplet.admin.ipv4_address_private} ${self.name}",
    ]
  }
}
3.4.1 Dependency – fixsaltminion.sh script
#!/bin/bash
# The below script ensures salt-minion nodes configuration file
# are patched to reach Salt master.
# args:
systemctl enable salt-minion
systemctl stop salt-minion
sed -i -e '/master:/d' /etc/salt/minion
echo "#scripted below config changes" >> /etc/salt/minion
echo "master: ${1}" >> /etc/salt/minion
echo "${2}" > /etc/salt/minion_id
systemctl start salt-minion
3.5 Cluster Pre-flight Setup
resource "null_resource" "cluster-init" {
    # so far we have relied on implicit dependency chain without specifying one.
        # Here we will ensure that this resources gets run only after successful creation of its
        # dependencies.
    depends_on = [
        "digitalocean_droplet.admin",
        "digitalocean_droplet.master",
        "digitalocean_droplet.minion",
    ]
  connection {
      host = "${digitalocean_droplet.admin.ipv4_address}"
      user = "root"
      type = "ssh"
      key_file = "${var.pvt_key}"
      timeout = "10m"
  }
  # Below we run few other scripts based on the cluster configuration.
    # And finally ensure all the other nodes in the cluster are ready for
    # ceph installation.
  provisioner "remote-exec" {
    inline = [
        "/opt/scripts/fixmasters.sh ${join(\" \", digitalocean_droplet.master.*.ipv4_address_private)}",
        "/opt/scripts/fixslaves.sh ${join(\" \", digitalocean_droplet.minion.*.ipv4_address_private)}",
        "salt-key -Ay",
        "salt -t 10 '*' test.ping",
        "salt -t 20 '*' state.apply common",
        "salt-cp '*' /opt/nodes/* /opt/nodes",
        "su -c /opt/scripts/ceph-pkgsetup.sh cephadm",
    ]
  }
}
3.5.1 Dependency – fixmaster.sh script
#!/bin/bash
# This script fixes host file and collects cluster info under /opt/nodes
# Also updates ssh_config accordingly to ensure passwordless ssh can happen to
# other nodes in the cluster without prompting for confirmation.
# args:
NODES=""
i=0
for ip in "$@"
do
    NODE="ceph-monitor-$i"
    sed -i "/$NODE/d" /etc/hosts
    echo "$ip $NODE" >> /etc/hosts
    echo $NODE >> /opt/nodes/masters
    echo "$ip" >> /opt/nodes/masters.ip
    sed -i "/$NODE/,+1d" /etc/ssh/ssh_config
    NODES="$NODES $NODE"
    i=$[i+1]
done
echo "Host $NODES" >> /etc/ssh/ssh_config
echo "  StrictHostKeyChecking no" >> /etc/ssh/ssh_config
3.5.2 Dependency – fixslaves.sh script3.6.3 Dependency – ceph-pkgsetup.sh script
#!/bin/bash
# This script fixes host file and collects cluster info under /opt/nodes
# Also updates ssh_config accordingly to ensure passwordless ssh can happen to
# other nodes in the cluster without prompting for confirmation.
# args:
NODES=""
i=0
mkdir -p /opt/nodes
chmod 0755 /opt/nodes
rm -f /opt/nodes/minions*
for ip in "$@"
do
    NODE="ceph-osd-$i"
    sed -i "/$NODE/d" /etc/hosts
    echo "$ip $NODE" >> /etc/hosts
    echo $NODE >> /opt/nodes/minions
    echo "$ip" >> /opt/nodes/minions.ip
    sed -i "/$NODE/,+1d" /etc/ssh/ssh_config
    NODES="$NODES $NODE"
    i=$[i+1]
done
echo "Host $NODES" >> /etc/ssh/ssh_config
echo "  StrictHostKeyChecking no" >> /etc/ssh/ssh_config
#!/bin/bash
# has to be run as user 'cephadm' with sudo privileges.
# install ceph packages on all nodes in the cluster.
mkdir -p $HOME/my-cluster
cd $HOME/my-cluster
OPTIONS="--username cephadm --overwrite-conf"
echo "Installing ceph components"
RELEASE=hammer
for node in `sudo cat /opt/nodes/masters`
do
    ceph-deploy $OPTIONS install --release ${RELEASE} $node
done
for node in `sudo cat /opt/nodes/minions`
do
    ceph-deploy $OPTIONS install --release ${RELEASE} $node
done
3.6 Cluster Bootstrapping
File: cluster-bootstrap.tf
resource "null_resource" "cluster-bootstrap" {
    depends_on = [
        "null_resource.cluster-init",
    ]
  connection {
      host = "${digitalocean_droplet.admin.ipv4_address}"
      user = "root"
      type = "ssh"
      key_file = "${var.pvt_key}"
      timeout = "10m"
  }
  provisioner "remote-exec" {
    inline = [
        "su -c /opt/scripts/ceph-install.sh cephadm",
        "salt 'ceph-monitor-*' state.highstate",
        "salt 'ceph-osd-*' state.highstate",
    ]
  }
}
3.6.1 Dependency – ceph-install.sh script
#!/bin/bash
# This script has to be run as user 'cephadm', because  this user has
# sudo privileges set all across the cluster.
OPTIONS="--username cephadm --overwrite-conf"
# pre-cleanup.
rm -rf $HOME/my-cluster
for node in `cat /opt/nodes/masters /opt/nodes/minions`
do
    ssh $node "sudo rm -rf /etc/ceph/* /var/local/osd* /var/lib/ceph/mon/*"
    ssh $node "find /var/lib/ceph -type f | xargs sudo rm -rf"
done
mkdir -p $HOME/my-cluster
cd $HOME/my-cluster
echo "1. Preparing for ceph deployment"
ceph-deploy $OPTIONS new ceph-monitor-0
# Adjust the configuration to suit our cluster.
echo "osd pool default size = 2" >> ceph.conf
echo "osd pool default pg num = 16" >> ceph.conf
echo "osd pool default pgp num = 16" >> ceph.conf
echo "public network = `cat /opt/nodes/admin.private`/16" >> ceph.conf
echo "2. Add monitor and gather the keys"
ceph-deploy $OPTIONS mon create-initial
echo "3. Create OSD directory on each minions"
i=0
OSD=""
for node in `cat /opt/nodes/minions`
do
    ssh $node sudo mkdir -p /var/local/osd$i
    ssh $node sudo chown -R cephadm:cephadm /var/local/osd$i
    OSD="$OSD $node:/var/local/osd$i"
    i=$[i+1]
done
echo "4. Prepare OSD on minions - $OSD"
ceph-deploy $OPTIONS osd prepare $OSD
echo "5. Activate OSD on minions"
ceph-deploy $OPTIONS osd activate $OSD
echo "6. Copy keys to all nodes"
for node in `cat /opt/nodes/masters`
do
    ceph-deploy $OPTIONS admin $node
done
for node in `cat /opt/nodes/minions`
do
    ceph-deploy $OPTIONS admin $node
done
echo "7. Set permission on keyring"
sudo chmod +r /etc/ceph/ceph.client.admin.keyring
echo "8. Add in more monitors in cluster if available"
for mon in `cat /opt/nodes/masters`
do
    if [ "$mon" != "ceph-monitor-0" ]; then
        ceph-deploy $OPTIONS mon create $mon
    fi
done
3.6.2 SaltStack Pillar setup
# file: top.sls
base:
  "*":
    - users
# file: users.sls
groups:
users:
  cephadm:
    fullname: cephadm
    uid: 5000
    gid: 5000
    shell: /bin/bash
    home: /home/cephadm
    groups:
      - wheel
    password: $6$zYFWr3Ouemhtbnxi$kMowKkBYSh8tt2WY98whRcq.
    enforce_password: True
    key.pub: True
  demo:
    fullname: demo
    uid: 5031
    gid: 5031
    shell: /bin/bash
    home: /home/demo
    password: $6$XmIJ.Ox4tNKHa4oYccsYOEszswy1
    key.pub: True
3.6.3 SaltStack State files
# file: top.sls
base:
    "*":
        - common
    "ceph-admin":
        - admin
    "ceph-monitor-*":
        - master
    "ceph-osd-*":
        - minion
# file: common.sls
{% for group, args in pillar['groups'].iteritems() %}
{{ group }}:
  group.present:
    - name: {{ group }}
{% if 'gid' in args %}
    - gid: {{ args['gid'] }}
{% endif %}
{% endfor %}
{% for user, args in pillar['users'].iteritems() %}
{{ user }}:
  group.present:
    - gid: {{ args['gid'] }}
  user.present:
    - home: {{ args['home'] }}
    - shell: {{ args['shell'] }}
    - uid: {{ args['uid'] }}
    - gid: {{ args['gid'] }}
{% if 'password' in args %}
    - password: {{ args['password'] }}
{% if 'enforce_password' in args %}
    - enforce_password: {{ args['enforce_password'] }}
{% endif %}
{% endif %}
    - fullname: {{ args['fullname'] }}
{% if 'groups' in args %}
    - groups: {{ args['groups'] }}
{% endif %}
    - require:
      - group: {{ user }}
{% if 'key.pub' in args and args['key.pub'] == True %}
{{ user }}_key.pub:
  ssh_auth:
    - present
    - user: {{ user }}
    - source: salt://users/{{ user }}/keys/key.pub
  ssh_known_hosts:
    - present
    - user: {{ user }}
    - key: salt://users/{{ user }}/keys/key.pub
    - name: "demo-master-0"
{% endif %}
{% endfor %}
/etc/sudoers:
  file.managed:
    - source: salt://files/sudoers
    - user: root
    - group: root
    - mode: 440
/opt/nodes:
  file.directory:
    - user: root
    - group: root
    - mode: 755
/opt/scripts:
  file.directory:
    - user: root
    - group: root
    - mode: 755
# file: admin.sls
include:
  - master
bash /opt/scripts/bootstrap.sh:
  cmd.run
# file: master.sls
# one can include any packages, configuration to target ceph monitor nodes here.
masterpkgs:
    pkg.installed:
    - pkgs:
      - ntp
      - ntpdate
      - ntp-doc
# file: minion.sls
# one can include any packages, configuration to target ceph osd nodes here.
minionpkgs:
    pkg.installed:
    - pkgs:
      - ntp
      - ntpdate
      - ntp-doc
# file: files/sudoers
# customized for setting up environment to satisfy
# ceph pre-flight checks.
#
## Sudoers allows particular users to run various commands as
## the root user, without needing the root password.
##
## Examples are provided at the bottom of the file for collections
## of related commands, which can then be delegated out to particular
## users or groups.
##
## This file must be edited with the 'visudo' command.
## Host Aliases
## Groups of machines. You may prefer to use hostnames (perhaps using
## wildcards for entire domains) or IP addresses instead.
# Host_Alias     FILESERVERS = fs1, fs2
# Host_Alias     MAILSERVERS = smtp, smtp2
## User Aliases
## These aren't often necessary, as you can use regular groups
## (ie, from files, LDAP, NIS, etc) in this file - just use %groupname
## rather than USERALIAS
# User_Alias ADMINS = jsmith, mikem
## Command Aliases
## These are groups of related commands...
## Networking
# Cmnd_Alias NETWORKING = /sbin/route, /sbin/ifconfig, /bin/ping, /sbin/dhclient, /usr/bin/net, /sbin/iptables, /usr/bin/rfcomm, /usr/bin/wvdial, /sbin/iwconfig, /sbin/mii-tool
## Installation and management of software
# Cmnd_Alias SOFTWARE = /bin/rpm, /usr/bin/up2date, /usr/bin/yum
## Services
# Cmnd_Alias SERVICES = /sbin/service, /sbin/chkconfig
## Updating the locate database
# Cmnd_Alias LOCATE = /usr/bin/updatedb
## Storage
# Cmnd_Alias STORAGE = /sbin/fdisk, /sbin/sfdisk, /sbin/parted, /sbin/partprobe, /bin/mount, /bin/umount
## Delegating permissions
# Cmnd_Alias DELEGATING = /usr/sbin/visudo, /bin/chown, /bin/chmod, /bin/chgrp
## Processes
# Cmnd_Alias PROCESSES = /bin/nice, /bin/kill, /usr/bin/kill, /usr/bin/killall
## Drivers
# Cmnd_Alias DRIVERS = /sbin/modprobe
# Defaults specification
#
# Disable "ssh hostname sudo ", because it will show the password in clear.
#         You have to run "ssh -t hostname sudo ".
#
Defaults:cephadm    !requiretty
#
# Refuse to run if unable to disable echo on the tty. This setting should also be
# changed in order to be able to use sudo without a tty. See requiretty above.
#
Defaults   !visiblepw
#
# Preserving HOME has security implications since many programs
# use it when searching for configuration files. Note that HOME
# is already set when the the env_reset option is enabled, so
# this option is only effective for configurations where either
# env_reset is disabled or HOME is present in the env_keep list.
#
Defaults    always_set_home
Defaults    env_reset
Defaults    env_keep =  "COLORS DISPLAY HOSTNAME HISTSIZE INPUTRC KDEDIR LS_COLORS"
Defaults    env_keep += "MAIL PS1 PS2 QTDIR USERNAME LANG LC_ADDRESS LC_CTYPE"
Defaults    env_keep += "LC_COLLATE LC_IDENTIFICATION LC_MEASUREMENT LC_MESSAGES"
Defaults    env_keep += "LC_MONETARY LC_NAME LC_NUMERIC LC_PAPER LC_TELEPHONE"
Defaults    env_keep += "LC_TIME LC_ALL LANGUAGE LINGUAS _XKB_CHARSET XAUTHORITY"
#
# Adding HOME to env_keep may enable a user to run unrestricted
# commands via sudo.
#
# Defaults   env_keep += "HOME"
Defaults    secure_path = /sbin:/bin:/usr/sbin:/usr/bin
## Next comes the main part: which users can run what software on
## which machines (the sudoers file can be shared between multiple
## systems).
## Syntax:
##
##      user    MACHINE=COMMANDS
##
## The COMMANDS section may have other options added to it.
##
## Allow root to run any commands anywhere
root    ALL=(ALL)       ALL
## Allows members of the 'sys' group to run networking, software,
## service management apps and more.
# %sys ALL = NETWORKING, SOFTWARE, SERVICES, STORAGE, DELEGATING, PROCESSES, LOCATE, DRIVERS
## Allows people in group wheel to run all commands
# %wheel  ALL=(ALL)       ALL
## Same thing without a password
%wheel        ALL=(ALL)       NOPASSWD: ALL
## Allows members of the users group to mount and unmount the
## cdrom as root
# %users  ALL=/sbin/mount /mnt/cdrom, /sbin/umount /mnt/cdrom
## Allows members of the users group to shutdown this system
# %users  localhost=/sbin/shutdown -h now
## Read drop-in files from /etc/sudoers.d (the # here does not mean a comment)
#includedir /etc/sudoers.d
3.7 Putting it all together
<h2″>4 Conclusion
Terraform and Saltstack both have various functionalities that intersect. But the above case study has enabled us to understand the power those tools bring to the table together. Specifying infrastructure and its dependencies not just as a specification, but allowing it to be reproducible anywhere is truly a marvel. Cloud Technologies and myraid tools that are emerging in the horizon are truly redefining the way of software development and deployment lifecycles. A marvel indeed!
References
[1] HashiCorp, https://hashicorp.com
[2] Vagrant from HashiCorp, https://www.vagrantup.com
[3] Terraform from HashiCorp Inc., https://terraform.io/docs/index.html
[4] SaltStack Documentation, https://docs.saltstack.com/en/latest/contents.html
[5] Ceph Storage Cluster, http://ceph.com
[6] Ceph Storage Cluster Setup, http://docs.ceph.com/docs/master/start/
[7] DigitalOcean Personal Access Token,https://cloud.digitalocean.com/settings/applications#access-tokens
This blog was the winning entry of the MSys Blogging Championship 2015.